Saturday 25 August 2012

Fatty top FAIL!

I have been horrible in keeping up with this blog - my excuse, as always, is that real life is being positively overwhelming, and is crowding out my virtual life. Bleh. The day job demands absolute commitment just so I can make it out the door at a decent-ish time (though admittedly I still like it), and I return home to two little girls who, obviously, eat up whatever I have left of the night. Plus, I have the awful grey EXAM cloud looming over my head - bleh, what a life.

Not that my needle hasn't been busy. A girl needs to stay sane, right? Friday and Saturday nights after midnight is my me-time, for however long I can stay awake (shamefully late, most days!). Though it's been mostly alterations and repairs, the fastest way to get a dress back into circulation again. Not a lot of fancy sewing for myself.

What I did get around to making (and photographing, and posting) was this top. Tunika 115B from the Burda magazine May 2009.


I found the pattern from Burdastyle.de, though for some reason it is no longer there now. You see how long it took for me to make it up! It was free, and it looked easy, so easy I thought I'd be able to wing it, in case I wasn't able to make out the translated German instructions. As it turned out, I still don't speak German (in spite of 2.5 years of weekly classes in secondary school), Burdastyle still does lousy instructions, and Google Translate still doesn't work.

I used a gorgeously light cotton lawn from the neighbourhood fabric store - completely fell for the robots! and envisioned a deliciously lightweight, floaty top.

It didn't take very long to make, the only trouble I had was with the neckline facing. Many bad decisions are made at 3 in the morning when my brain shuts down without my knowing it.

I started with a full  neck facing, but found that the fabric was so sheer the pattern from the facing piece showed through on the front. Of course I didn't have any plain white light cotton on hand, and of course (at that point) I had to sew NOW! NOW! and couldn't wait for when I was next free to visit the fabric shops. So I cut the facing off, leaving only a thin band around the edge - much like a curved seam binding. Brilliant idea, no?

Not for this fabric, which, as it turns out, was too light to withstand even that teensy weight of extra fabric. Look at how it gapes at the neck!


I also forgot how horribly PREGNANT these floaty tops make me look. Short, not-very-thin people shouldn't wear floaty tops. Simple rule, right? Bleh. I forgot.


I have since worn this top out twice, and both times:
1.Couldn't help looking in every mirror I passed by and thinking how frumpy I looked in it
2. My underwear peeked out of the neck hang when I had the girls in my arms
3. I kept tugging on the back hem so the neck wouldn't gape so much.

The back is the only decent looking bit, though it's a little long. Probably I should walk around backwards more when I wear this.


Summary - it's off to the cutting bin with this one. At least I like the fabric enough to even want to save it.


Adjustments: I cut my usual size 38, omitted the neck closure since it was wide enough to pull over my head. That explains the strange un-utilized back seam. In future (if I ever make this again) I will shorten the hem 7cm (about 3 in) and perhaps change the front pleats to a single inverted box pleat.


Fabric:
A $10/yard lightly slubby cotton lawn. I wonder if this style might look better in a thicker fabric, say a jacquard?


Tuesday 15 May 2012

The Pseudo-Complicated Front Knot Dress

And here I am popping my face into Blogland again...hi there!

 I've been awful about keeping up with this blog - excuses excuses, yes I know, but it's just gotten so BUSY around here. In the last three months I've submitted and defended my thesis (yay! glad to have gotten that behind me!), gone back to 'real' work yet again, and taken another postgraduate exam (it so doesn't end there), the results of which are still unknown. And of course there are always my two little munchkins at home whom I can never spend too much time with!

I wish I didn't need to sleep.

As far as sewing goes, it's not been too difficult snatching bits of sewing time here and there. The babies sleep occasionally, and since my left brain often shuts down some time before my eyes shut down, I'm rather partial to little bursts of late-night sewing. It's blogging that's the issue - it takes a surprising amount of effort to actually get a post up! *whine whine whine*

First things first.

Many thanks to Cation Designs for the Liebster Blog Award! You are too kind :)


The origins of the Award are murky but the general consensus is that it originated in Germany ('Liebster' means favorite or dearest) to showcase bloggers with fewer than 200 followers. According to award rules I'm to pass it on to five more blogs of note. But because I'm a brat, and a busy one at that, I don't follow too many blogs. And eh, most of those on my reader have way more than 200 followers. So I'm only passing this on to:

1. Far at Memoryseed - she was my very first friend at Burdastyle when the virtual sewing community was still new and strange to me (ok while no longer 'new', it's still 'strange' in many ways).

2. J at Making Mum - my favourite non-sewing blog. She's a mama extraordinaire who cooks up a storm, scraps, and photographs.


And with the housekeeping done I can talk about my new dress.

 Behold the pseudo-complicated wonder of Burda 03/2012 #108B!


I was totally cheapskate and waited for the pdf pattern rather than buying the mag, since it was the only thing I wanted to make from that issue. I realise that I actually prefer pdf patterns to the traditional tissue ones - sure, you have to cut and stick the printed ones up, but since my vintage patterns always need grading, and I'm loathe to cut into the multi-size modern ones, I always end up tracing the traditional ones out onto more tissue. No time saved there. And I enjoy the heft of printed-out patterns - they keep better and sit better on the fabric.

Is that just me?

The dress was really quite simple to make. I wanted the border of the voile to form the neckline, so I chopped the front piece into two right in the middle at the knot. After that it was easy to lay the neckline of the bodice and the hemline of the skirt on the border.

And since the pattern was originally for tall girls, I chopped 5 inches off the hem (yes I'm THAT short, stop rubbing it in!), and also made the armhole shorter? smaller? how do you say it? by 3/8 inch. Because I don't like armholes that show the top bits of my underwear. But that last alteration turned out to be unnecessary.


I didn't like the way the fabric slides up and down the knot hole in the middle. Ordinarily that wouldn't be an issue with this pattern, but because I'd made the bodice and skirt from two pieces, the midline seam didn't look too pretty peeping out of the hole. So I sewed the gap and the fabric shut. Unfortunately I must have done it weirdly, because the fabric does this strange bunching-up thing that makes me look unnecessarily pregnant. I'll have to rip and repeat.

 Of course I was also a total boob-head and forgot that the Burda patterns have NO SEAM ALLOWANCES, and of course I forgot to add any on my fabric. So after I did the yell-and-stamp-around-the-room-and-tug-at-my-hair thing, I sewed the thinnest 0.5cm hem I dared - two rows of stitching for strength and thank you SO much Mum for my serger!

 It turned out not too badly, although just the weensiest bit tight around the chest. Maybe I'll re-sew the gap in the front and give the dress to my sister. Then I'll have an excuse to make another for myself muahahaha! 


Question. 
While the embroidered border is certainly very sweet and all, do you think it's a little too girly? I'm not much of a girly-girl, and a picture like this just looks a little wrong, somehow (yes that's my bra-strap - stop lookin'! don't you wear one too):


I have the option of folding the scallopy bits in, to tone down the Girl Effect. Though that also ups the Cleavage Effect (rather obvious in this pic), and I do work in a conservative environment. Which is the two evils is lesser - the Girl Effect, or the Cleavage Effect?


Adjustments: I cut size 38 and chopped up the front dress piece into two at the slit so I had separate bodice and skirt pieces. Shortened hem by 5in and took up armholes by 3/8in (last was unnecessary).

I ended up doing strange things with the lining. The front bodice had to be lined, obviously, since the embroidery had little holes in it and I didn't want to put my boob-skin on public display. Since the lawn is a little sheer, I also started out by lining the skirt. But the extra layer of fabric wreaks havoc with the knot front - bunches and poufs out crazily, and generally makes me look ultra-pregnant. I cut away the lining at the front skirt, but was loathe to not line the back. So I ended up with a weird contralateral half slip - front bodice and back skirt lining!  

Fabric:
A $12/yard cotton-blend lawn with a lovely embroidered hem. It has just the right amount of body to keep its shape while still flowing nicely enough to cover up all my horrid lumps. I managed to squeeze this dress out of 1.5 yards of it - there was really nothing left over!

Friday 16 March 2012

A naughty little binge

So I needed notions for my VintageModern Challenge dress, and found myself with a relatively free lunch hour.

And off I went to People's Park, our local fabric haunt.

I have a love-hate relationship with this place.

It's a little old 3-storey building housing a decent array of dinky little natural-ventilation shops selling fabric bolts, that tend to be staffed by friendly (but slick!) old men and ladies. For the likes of me, underprivileged in the fabric-major-deal-warehouse and fabric-in-thrift-shops arenas, this is as close to fabric paradise as you get. I always get that buzzy high and permanent smile in this place. But the size of my fabric stash dictates that I should resist coming here often. Difficult, considering it's only a 10-minute walk from my workplace!

Anyway, like I said, I actually had a good reason for this visit.

And as usual, I emerged within the hour with a little more than what was on my shopping list.


At least each of these has a Planned Destiny.

The one on the left is a cotton blend with a nice silky touch. I'm planning to make it into this, when it become available online -


It's #108 from the 3/2012 Burda issue that I'm too cheap to buy, since this pattern is all I want from it. I'm hoping Burda will upload it for sale, failing which I will have to dig out my Pattern Magic book and draft the pattern for myself. Save me the work, Burda!

The one in the middle is a nice spotty cotton drill that I envision as a pair of straight-cut, flat front trousers or capris. Trousers probably, since I wear those to work occasionally (I might wear them more often if they were polka dotted!). Of course I forgot that sewing trousers scares the heck out of me!

And the one on the right is a very pretty light cotton voile. I bought 4 yards of it with the dreamy image of matching dresses/playsuits for myself and my girls. That might actually become a reality, since I think matchy-matchy mother-daughter things can be cute if done properly! Maybe a playsuit for me, a sundress for the big girl, and a summery top for the little one who hasn't much hair yet?

Wednesday 14 March 2012

My VintageModern Design Challenge Entry


I toyed around a bit with the idea of entering the Indygo Junction x Burda's VintageModern Design Challenge. On one hand I'd wanted to join a contest of some sort this year just for the fun of it - it was even down on my Sewing Resolution List. Plus this one was actually feasible sounding - no entry barrier to internationals, and the potential to result in something I might see myself actually using. With my super-limited sewing time, I'm fiercely stuck on the admittedly narrow idea that I only sew directly useable things. After all, I got into this sewing thing because I: (1) need clothes, and (2) can't buy useable RTW. Not because I have lots of time to make corsets, costumes and frills to sit pretty in my wardrobe. Although my naive mind at the time failed to consider UFOs.

So anyway, I was a huge cheapskate and downloaded all the free e-patterns from Indygo Junction, and just sat on them for a couple of weeks.

I finally bit the bullet in mid-Feb, and told myself I'd make up that nice looking little Sateen Blouse, so that even if I didn't end up in the contest, I'd still have a template for some nice basics.

Was I so wrong.

Muslin #1 was made directly by following the directions on the printout, and showed me that either my measuring-my-own-body techniques are way off, or that women of the time wore REALLY, REALLY loose clothing. The thing was slipping off my shoulders - bleah! I had to hide that hideous thing at the bottom of my scrap pile to stop myself feeling guilty about wasting fabric. Yes, I know...it's a muslin, right? Made of 'scrap' fabric, right? Well mine was. But I can't make peace with the idea of wasting any sort of fabric, which explains why I'm being slowly overrun by tiny fabric scraps for that crazy quilt I'll never make. And so far, I've been able to use all my muslins for casual wear, or least for lounging about at home!

I made some major modifications to the blouse, took in the width by ~3 inches on each side, reduced the bat-winginess of the sleeves, and put in some darts. There. Muslin #2 wasn't bad at all.

And then I decided to kill myself by adding a little puffy skirt to the bodice, to make a dress.

I will admit that I was originally inspired by the great Mary Katrantzou's lampshade silhouette.


Why would anyone want to add inches to their hips, you ask?

I thought the same way at first, though the prints! the prints! how gorgeous art thou, oh prints! And in a bit the lampshade shape grew on me too. I found myself thinking about how I could bring the skirt up just above the umbilicus (that's bellybutton in normal-speak) to cover my yummy mummy tummy - of course I'd try to turn it into a way to cover up bits of myself I don't like, wouldn't I?

That lampshade thing was HELL. I started drafting one from scratch and of course it didn't work. THREE muslins and I was ready to tear my hair out (and also worship even more abjectly at Ms Katrantzou's pedestal)!

TWO WEEKS into the thing, I finally gave up the fight and decided on a skirt based loosely on Burda's Marie pattern, modified to look like one on a lady I saw on the train.


This is the final product. I used 1.7 metres of a mid-weight green quilting cotton that was on sale for $7/yard at Spotlight (yes, these are the sorts of 'sale prices' people in my parts are used to paying), one package of blue piping, and an 18inch invisible zipper for the centre back closure.

It doesn't look like awfully much of a dress, actually, does it?

I'm a little upset that the bodice creases and doesn't even fit me perfectly - I'm going to make excuses for myself and say that it's just difficult pinning fabric on yourself, as opposed to a dressform. But considering the time+blood+sweat+tears that went into drafting it, I'll still wear my dress out.

This is what it actually looks like all naked and beltless.


And this is the back. The print is a little busy to see, but I divided each back dart into two, and matched up the skirt and bodice darts. That took quite a lot of fiddling with too, since I'd already sewn up the bodice and had to fold and match the darts on my body.


Here's a close-up. The double darts really made the fit very good, though I couldn't line them up perfectly.


And here's a shot of the details on the sleeve and collar. The piping went in surprisingly quickly (or maybe I thought so because I'd already spent so much time on the other stuff!).


This is my favourite shot of the nude dress and I'm a little sad it's blurry. Mr Tropical was out on a run so it was just lil ol' me with the self-timer rushing for the deadline, and I just couldn't replicate the shot. Like my green Westwood x Melissas? :)


Oh, and in case you're wondering, my bangs are assymetrical ON PURPOSE. My nice hairdresser likes having fun with my hair whenever I visit, and this time I told her, 'I want a shave and assymetric bangs', envisioning Rihanna. But this sinusoidal fringe was what she came up with. It looks kinda like a pudding bowl, but I kinda like it. I think.

Sunday 26 February 2012

The Valentines' Set

It's kinda sad, but there hasn't been much to write about of late. It's not that my machine hasn't been busy - it has, but alterations and home stuff, while completely necessary, just aren't awfully blog-worthy.

I did have fun with my ironing board covers, though! I was sick of buying cheapo ones that died within a couple of sessions (ironed through 3 in the last 6 months! o_O and I'm not even that hardworking), and since I do iron a fair bit, decided to make myself some nice cushy ones. I used batting and some light Ikea canvas leftover from one of my dresses, and it turned out so well I made one for my mum too. It's quite a boring print, at least when made into an ironing board cover, which explains the lack of pictures. But I'm sure it'll take me a while to iron through that!

What I did manage to sew (and photograph) was a little something risque/tacky/cute for Valentines' - lingerie!

This!

Since neither of us will pose in these things, this is the only shot there'll be of them.

I picked up the fabric from the remnant bin at my local Spotlight - it's an extra-wide slumber satin and there was a generous metre of it. It was extra-cheap for being 'damaged', read: tiny white streaks where the printing went a little wonky. For $2, of course I could work around those!

For me, I chose the Bikini #108B pattern from the 06/2011 issue of Burda mag, which looked cute in the pics. The whole set came together in one evening, which is pretty quick for me!

The bottoms were exactly what I wanted - tiny and bloomer/court-jester-like, and so cuuute! Though I can't imagine wearing anything like that in public even in a different fabric, which is what the mag photographed their models doing.

The bra top was a different story. Either that, or my anatomy is completely wonky. Since this was a novelty-type project (ie. would likely not see many wears), I decided to use snaps for the back closure instead of fiddling about with hooks. Which turned out to be a good decision, because the fit was horrible. I cut a size 36 like I usually do, but the cups came out spaced so terribly far apart that I had trouble keeping the straps from falling off my shoulders. I used to swim semi-competitively until a few years ago, and look like an infantry tank in halter tops, so I know I do NOT have narrow shoulders! Needless to say my boobs came peeping out every few minutes, which is not what I want in a bikini, even if my husband begs to differ. FAIL!

Of course the thought crossed my mind that all this trouble might be attributed to the slipperiness of the fabric, and how it seems to repel skin in general. However, I will not be making this in cotton just to test the hypothesis any time soon, as my dainty busts require padded covers in public at all times.

For him, I traced off the boxers from an existing pair, and since boxers are pretty forgiving anyway these fitted pretty well. Interesting note: these fit me too! So I have a free lounge-around-the-house shorts pattern :)

What I'm pretty proud of is that I managed to try new techniques even with this quick little project.

Apart from this being my first time sewing with satin (this must have been a special sort of satin, because it wasn't slippery to handle at all despite its shininess), it was also my first time sewing in an elastic waistband. I know, I know, where have I been all this while, right? I've known theoretically how I should install one for yonks, only I've never had the need prior to this. That wasn't too difficult, only I didn't bother with changing the colour of my thread!.


And also, ta-dah! I finally tried out my new serger! Behold the beauty of the serged seam! It really works like a dream, and I agree with the Selfosh Seamstress, it almost feels like cheating to not have to French seam/Hong Kong seam/overlock/pink/etc, to manage those ravelly seams. The serger serges and cuts all together, and it's all done perfectly in a wink. I'm so pleased! So that's one thing I can tick off my New Year Resolution list. Or do I also have to learn to thread it before it's counted?


I'm also quite chuffed about the double-hems. I was worried, and had envisioned the satin stuff slipping about in my fingers and in my machine. Turned out it was for naught - not that I'm particularly skilled, but that this satin handles almost like cotton sateen, not silk!


After I was done with the sewing there was still a half metre of fabric left over. I haven't the foggiest idea what else I could do with lipstick-print black satin - any ideas?

And Mr Tropical's response to my painstakingly-sewn set?

'Hey, what's all this?' And he promptly took all of it off.

Grumph.

Tuesday 31 January 2012

Darth Vader Prosperous Audacity


I wanted a dress to do the traditional visiting rounds in, for Chinese New Year. The traditional female dress for such occasions is the cheongsam. Well, this isn't a true cheongsam in that it isn't super tailored to my curves (I don't much want to show off the front curve anyway). Though I did make it a little oriental-inspired with the high collar and chinese knot (which I learnt how to do following multiple YouTube vids).


It's in auspicious red and orange colours, so it's very New Years-y indeed, never mind the Darth!! It was great, because all the non-traditional younger folk recognized him, and all the traditional old folk just thought it was a nice red auspicious dress. Hah!

I've never enjoyed New Year visiting - it's basically just going from house to house smiling stiffly, making small talk, and generally being respectful to seniors. It's not a meet-up at all, oh no. It's probably the modern equivalent of the victorian habit of 'making house calls'. But this year, I was giggling all the way - watching my kids receive their red packets from genial old people, while I strutted around the houses in my Darth dress, past all the open-mouthed youths who were too polite to comment (it's an asian thing). What ho!


This is made from an old bedsheet off Ebay which wasn't cheap. I loved the Darth and the colour though. It's very well used, so it's all washed and a little faded, though super comfy. Darth was all up the lower right corner of the sheet, with flames across the lower left corner, and his name splashed across the upper left corner. I had to cut off his saber to fit him on my dress (boohoo!). I used bits of his name across the collar, and the flames for the back. The button was a leftover yellow bit, and I used leather cording inside to make the button puffy and stiff.


The cut-out was just for fun. I'm on a run with the cut-outs!


There wasn't nearly enough to make the whole of the back, so I covered up with a bit of orange chiffon. It was my first attempt with chiffon - the slipperyness was scary, and not being able to rip the seams also bothered me somewhat. But I'm glad to say it turned out ok. Just ok, not great. I need more practice with the curves. And now I feel a little sad that I didn't make a bigger, sexier see-through panel! Grumph.


I used my trusty shift dress pattern for this again. I really like the way this fits on me, now that I've got it exactly the way I like. It hides many a flaw and is quick to sew, to boot. I'm in quite a dilemma now, actually - should I go for the 'signature style' thing, and make a wardrobe fill of shifts? I can think of literally a hundred different ways to sew this up. Or should I be brave, and challenge myself with another pattern, another material (KNITs! *shiver*)?

Here is the dress in action at First Aunt's house. I'm brandishing two mandarin oranges - the dialect word for them, 'kum', sounds like gold in the language. Yes, the Chinese are only concerned about money. Haha.

Thursday 26 January 2012

A mini-tutorial for making a faux-knot cut-out

As promised, here is a very tiny tute on how to make the knotty cut-out on this top.


My apologies in advance if anything isn't clear - this is my first tute-writing attempt, though I sure do read a lot of them! If you have questions, leave me a comment and I'll try to answer you.

Right then, here goes.


Step 1: Pin cut-out template onto shirt front

On a piece of paper, draw the shape and size of cut-out you want. To have it symmetrical, you might find it helpful to fold over the paper and mark just one half.

Cut out the shape and pin it to the front of your shirt. I chose to atttach the neck facing and sew up the shoulder seams of my shirt before doing the cut-out. This is useful because, 1. you don't have to fiddle with the facing in a very small sewing space later; and 2. you'll have two layers of fabric to strengthen the cut-out with.


Step 2: Mark cut-out on shirt front

Draw around your template with tailor's chalk or soluble marker. You can use anything that washes off your fabric (test it first!).


Step 3: Cut out centre and snip until edges.

Draw a mini-cutout-shape in the centre of the marked area, leaving about 1.5cm (1/2 in) all around the sides. The point here is not to be dead-accurate. Just to make sure you leave a good seam allowance to work with.

Cut out the shape you've drawn.

Take some sharp pointy scissors or shears and make small snips, about 1cm apart, all around the edges of your cut circle. Make sure you cut right up to the template line (I have that marked in blue). This is where you can be as hardworking as you like. More snips = more work, but also = a nicer, curvier circle. Too few snips, and your circle will end up looking like a polygon. But too many snips, and you'll go crazy in the next step!


Step 4: Turn in the snipped bits
This is where it starts getting tricky, and fiddly. You have to turn in the bits you snipped, to make a pretty circle. Do the fashion fabric layer first, turning the snipped bits down into the inside of the shirt.

Turn in a couple of bits at a time, and crease against the marked (blue) line with your thumbnail as you go. If it helps, pin down the folded edges. And if you're using a fabric that doesn't hold a crease well, er...my best wishes!


Done with the fashion fabric layer? Now do the same with the facing layer, turning those bits up into the inside of the shirt. If you want to be precise, try turning the bits on this layer slightly deeper than those on the top (fashion) layer, so you won't have ugly facing bit poking out into your top.


Step 5: Cut out some interfacing

Phew! That's done! This next step is optional. You're going to use interfacing to back the folded snippy bits you've just made. I like to do this because it stabilizes my work and makes stitching easier, though you can skip it if it's too much trouble.

Put your old paper template (the one that you drew around on the shirt front) on some interfacing, mark and cut out the circle. Since you don't want this to peek out on the front of the shirt, it's a good idea to cut the circle a very little bit bigger (say 2-3mm) than the marking.

Leave a good amount of interfacing around the cut circle, say 3-5cm all around. The less you leave, the fiddlier the interfacing piece will be, and the more your circle will warp. Don't worry about excess, you can trim it off later.

Cut out another piece for the facing.


Step 6: Iron interfacing onto fabric

Heat up your steam iron, and place the interfacing on the back of your fashion fabric.

Tuck in the snippy bits under the facing.

When you're ready, PRESS. And voila! The snippy bits are all nice and neat, and you have a piece of fabric with a cut-out in it. YAY!

Do the same for the interfacing on the facing.


Step 7: Flip fabric right side out and finish cut-out.

Trim the excess interfacing off, and flip your shirt pieces back together.

Press a little.

There's the cut-out. Isn't it gorgeous? Aren't you proud of yourself?

There are a couple of ways you can finish the cutout. The easiest would be to topstitch, in a matching or contrasting thread. If you want a subtle, invisible finish, you could pin and slipstitch the edges closed. Me? I chose to line and close it with a contrasting trim. Which was a BAD idea, because the trim ruckled enormously despite it being cut on the bias. A good press made it look slightly better (the ruckle took on the appearance of a quasi-gather), though not perfect. Bummer! I'm not about to do this again.


Step 8: Cut out fabric for knot tie

Now, cut out some fabric bits for a the knot tie. Use contrasting or matching fabric as you like. I was indecisive and cut out both!

Also remember to cut out a small strip for the middle part of the bow. A 5 x 2cm (2 x 3/4in) bit will do.


Step 9: Stitch knot tie fabric

Lay the pieces for the knot tie fabric right sides facing. Stitch all around using a 0.5cm seam allowance.


Step 10: Turn inside out.

Leave 4cm (1.5in) space unstitched for turning.

Clip corners and turn inside out. I've shown the underside of my knot tie for contrast.


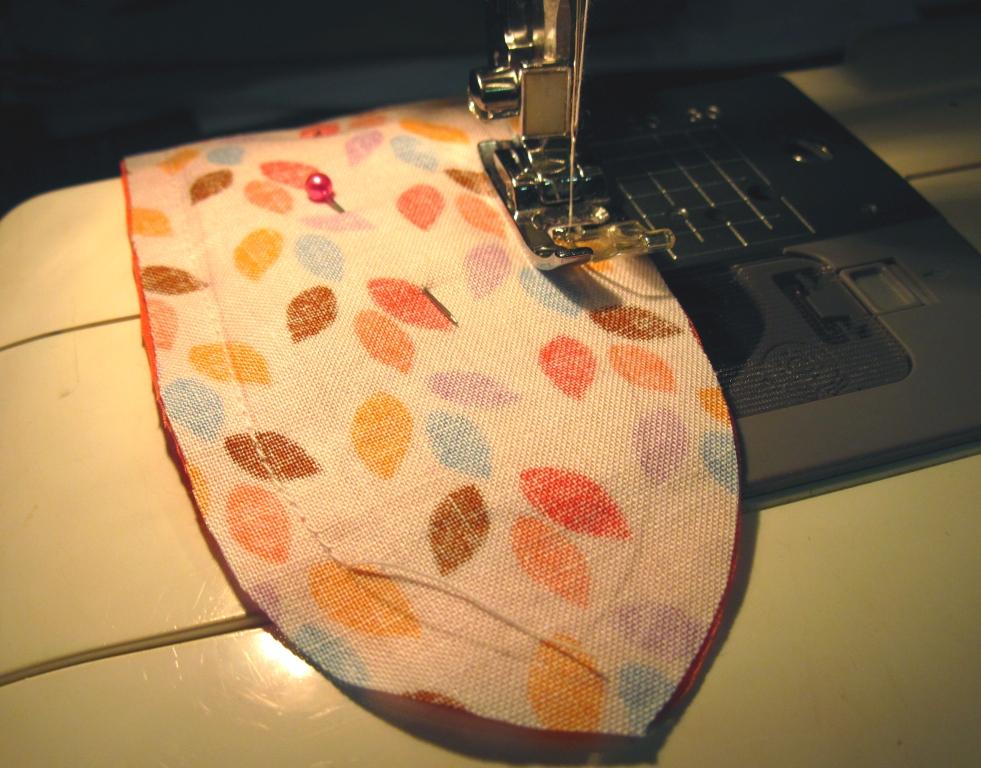
Step 11: Topstitch knot tie piece

Again, this is optional. A good press will allow this piece to lie flat. I like to topstitch, because: 1. these small bits often get mangled in the wash, and it's impossible to ever get back the original shape without topstitching; and 2. I just like the pretty finish. (as you can see my top-stitching skill isn't tops)


Step 12: Twist knot piece and tack on.

This will be fun - give the knot piece a twist, and baste it onto the shirt. Use a half-twist if you want a bi-coloured tie like I have here, or a full twist if you want both ends the same colour. I used a contrast thread so you can see how the basting goes.

In general, you don't have to be too neat about this as long as you keep the basting within the area that will be covered up by the middle bit. But to be safe, I'd recommend using matching thread, and just putting in 3 or 4 firm, well-placed stitches.

Sew up a tube with the little 5 x 2cm scrap, and wrap it over the middle of the knot. Stitch in place, and you're done!