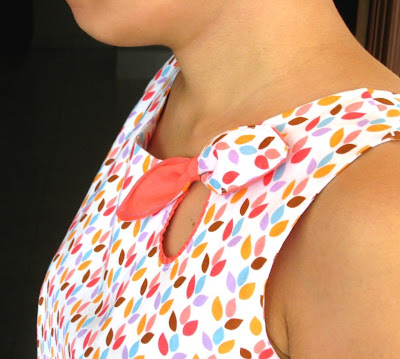
As promised, here is a very tiny tute on how to make the knotty cut-out on this top.
My apologies in advance if anything isn't clear - this is my first tute-writing attempt, though I sure do read a lot of them! If you have questions, leave me a comment and I'll try to answer you.
Right then, here goes.
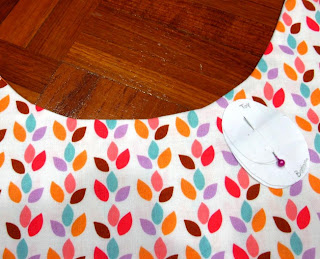
Step 1: Pin cut-out template onto shirt front
On a piece of paper, draw the shape and size of cut-out you want. To have it symmetrical, you might find it helpful to fold over the paper and mark just one half.
Cut out the shape and pin it to the front of your shirt. I chose to atttach the neck facing and sew up the shoulder seams of my shirt before doing the cut-out. This is useful because, 1. you don't have to fiddle with the facing in a very small sewing space later; and 2. you'll have two layers of fabric to strengthen the cut-out with.
Step 2: Mark cut-out on shirt front
Draw around your template with tailor's chalk or soluble marker. You can use anything that washes off your fabric (test it first!).
Step 3: Cut out centre and snip until edges.
Draw a mini-cutout-shape in the centre of the marked area, leaving about 1.5cm (1/2 in) all around the sides. The point here is not to be dead-accurate. Just to make sure you leave a good seam allowance to work with.
Cut out the shape you've drawn.
Take some sharp pointy scissors or shears and make small snips, about 1cm apart, all around the edges of your cut circle. Make sure you cut right up to the template line (I have that marked in blue). This is where you can be as hardworking as you like. More snips = more work, but also = a nicer, curvier circle. Too few snips, and your circle will end up looking like a polygon. But too many snips, and you'll go crazy in the next step!
Step 4: Turn in the snipped bits
This is where it starts getting tricky, and fiddly. You have to turn in the bits you snipped, to make a pretty circle. Do the fashion fabric layer first, turning the snipped bits down into the inside of the shirt.
Turn in a couple of bits at a time, and crease against the marked (blue) line with your thumbnail as you go. If it helps, pin down the folded edges. And if you're using a fabric that doesn't hold a crease well, er...my best wishes!
Done with the fashion fabric layer? Now do the same with the facing layer, turning those bits up into the inside of the shirt. If you want to be precise, try turning the bits on this layer slightly deeper than those on the top (fashion) layer, so you won't have ugly facing bit poking out into your top.
Step 5: Cut out some interfacing
Phew! That's done! This next step is optional. You're going to use interfacing to back the folded snippy bits you've just made. I like to do this because it stabilizes my work and makes stitching easier, though you can skip it if it's too much trouble.
Put your old paper template (the one that you drew around on the shirt front) on some interfacing, mark and cut out the circle. Since you don't want this to peek out on the front of the shirt, it's a good idea to cut the circle a very little bit bigger (say 2-3mm) than the marking.
Leave a good amount of interfacing around the cut circle, say 3-5cm all around. The less you leave, the fiddlier the interfacing piece will be, and the more your circle will warp. Don't worry about excess, you can trim it off later.
Cut out another piece for the facing.
Step 6: Iron interfacing onto fabric
Heat up your steam iron, and place the interfacing on the back of your fashion fabric.
Tuck in the snippy bits under the facing.
When you're ready, PRESS. And voila! The snippy bits are all nice and neat, and you have a piece of fabric with a cut-out in it. YAY!
Do the same for the interfacing on the facing.
Step 7: Flip fabric right side out and finish cut-out.
Trim the excess interfacing off, and flip your shirt pieces back together.
Press a little.
There's the cut-out. Isn't it gorgeous? Aren't you proud of yourself?
There are a couple of ways you can finish the cutout. The easiest would be to topstitch, in a matching or contrasting thread. If you want a subtle, invisible finish, you could pin and slipstitch the edges closed. Me? I chose to line and close it with a contrasting trim. Which was a BAD idea, because the trim ruckled enormously despite it being cut on the bias. A good press made it look slightly better (the ruckle took on the appearance of a quasi-gather), though not perfect. Bummer! I'm not about to do this again.
Step 8: Cut out fabric for knot tie
Now, cut out some fabric bits for a the knot tie. Use contrasting or matching fabric as you like. I was indecisive and cut out both!
Also remember to cut out a small strip for the middle part of the bow. A 5 x 2cm (2 x 3/4in) bit will do.
Step 9: Stitch knot tie fabric
Lay the pieces for the knot tie fabric right sides facing. Stitch all around using a 0.5cm seam allowance.
Step 10: Turn inside out.
Leave 4cm (1.5in) space unstitched for turning.
Clip corners and turn inside out. I've shown the underside of my knot tie for contrast.
Step 11: Topstitch knot tie piece
Again, this is optional. A good press will allow this piece to lie flat. I like to topstitch, because: 1. these small bits often get mangled in the wash, and it's impossible to ever get back the original shape without topstitching; and 2. I just like the pretty finish. (as you can see my top-stitching skill isn't tops)
Step 12: Twist knot piece and tack on.
This will be fun - give the knot piece a twist, and baste it onto the shirt. Use a half-twist if you want a bi-coloured tie like I have here, or a full twist if you want both ends the same colour. I used a contrast thread so you can see how the basting goes.
In general, you don't have to be too neat about this as long as you keep the basting within the area that will be covered up by the middle bit. But to be safe, I'd recommend using matching thread, and just putting in 3 or 4 firm, well-placed stitches.
Sew up a tube with the little 5 x 2cm scrap, and wrap it over the middle of the knot. Stitch in place, and you're done!


Looks lovely when you got it finished! It's an easy to follow tutorial. Thanks for sharing!
ReplyDeletethis was a really easy to follow tutorial. thank you for sharing.It's really lovely!
ReplyDeleteThis is so cute! I love the fabrics you chose. And your tutorial is easy to follow!
ReplyDeleteI wonder if you could get the same contrasting trim effect by inserting a flat piping in between the fashion fabric layer and the facing. You'd have to topstitch, but I think that might help solve the rumpling problem. I love the look of the contrasting trim, so I'm trying to help figure out a way to get that look. Nice job!
- Usha in San Francisco
I love this idea. However, I think a bit of washable glue stick to hold down the snips would be much easier to do than the interfacing. Thank you for sharing your well-written tutorial.
ReplyDeleteHave you experimented with a buttonhole stitch? Why not stitch around your shape with a satin (buttonhole) stitch and then cut the middle out? It might be necessary to use an extra bit of interfacing in the cutout area when you're installing the facing. In the end, you will have also "tacked down" your facing in an extra spot. And once you have your facing all set, you only have the extra step of forming your "buttonhole". This could be done in a matching or contrasting color. Since you are cutting out a much bigger than normal hole, you could probably even play around with the width of your zigzag to have a wider area of the contrasting thread if you want a more decorative feature.
ReplyDelete